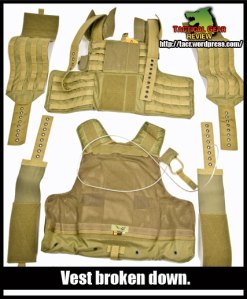
This is the first part of our description of how to re-assemble the Flyye FRV. Go though this one first, then the front re-assemble and lastly the back part.
Ok, so you’ve got a Flyye CIRAS style vest (Force Recon Vest, FRV ) and it has the ability to fall apart when needed. First of all why? Well in an operational situation the main reason to get your kit off fast is because you’ve been hit, or injured in some way and access is needed to the entrance, and exit, of the wound. A C-spine injury is one where your spine could have been damaged, normally due to a major impact with a object such as in a vehicle accident, parachute fall or any fall from height. To prevent further injury the casualty must be kept flat and still, no movement. The Flyye FRV allows you to get a loaded vest off fast, with the least amount of movement to the casualty. Note: this is something your mates should know, as they will be taking the vest off!
Why else? Well the vest is adjustable. When you take it apart you will seen that the shoulder straps, internal cummerbund and external cummerbund have multiple grommets (metal sealed holes) in it. This is for you to adjust the vest to your own particular body width and height. You might also find that you don’t want the internal elasticated cummerbund and want to remove it, the following pictures will show you how. We like it personally, as it keeps our guts in when running around.
In doing these pictures we have gone though every single step you will need. It might seem complicated, but just go though it step by step and when you’ve done it once you’ll be able to re-assemble it in less than 7 minutes (going slow). The fastest we’ve done it is just over 4 minutes (we’re old) and you’ll feel more confident once you’ve done it. Why wear the kit if you don’t know what it can do?
Ok, first step (click on pictures to enlarge). When you get your vest it will come secured (Flyye FRV). This means that even if you pull the cord it won’t come apart. The reason for this is that you need to know how it works before you mess with it. The last thing that is wanted is for you to pull the cord out of curiosity and then not know how to put it back together again. It’s basically got a safety catch. The first pictures will show you how to release the ‘safety catch’ and allow the vest to become ‘operational’.
To start turn the vest over so your looking at the back of it. Open up the flap to expose the release cable, and the ends of the various straps. Untie the cable (it has a small piece of paracord wrapped around it) and insert it into the ‘tube’ at the bottom of the vest. This keeps it tidy and out of the way. Close the flap and your ready to go.
NOTE: When doing this make a note of the holes that are threaded with the paracord so you know which ones to put them back though. It’s no drama if you don’t, but it will save you a bit of time.
Now the vest is setup correctly, we can go onto the next step which is to pull the cable out and release the individual components of the vest. Your’ll only need to go through the pictures a couple of times and then it will become second nature.
Locate the release handle at the bottom of the vest, take a hold and pull down firmly. Your pulling this from the back to the front so don’t be too delicate with it. Once it reaches the half-way mark it will be easier.
The cable is now fully out. If your wearing the vest at the time, especially if the pouches are loaded, you should just be able to pull it apart. Ours isn’t though, so now we’ll show it being split up and what it’s comprised of.
Once the straps are removed, pull the external and internal cummerbunds out from each side and you should end up with all the parts in the picture below.
That’s the vest split up, now go onto the second part to see how it all goes back together.


